小红书x-s参数加密逆向实战

⚠️ 免责声明:本文仅用于安全研究与技术交流,请勿将相关技术用于非法用途。恶意使用相关技术造成的一切后果由使用者自行承担。

目标站点:https://www.xiaohongshu.com/explore

概述

小红书Web端在API请求中使用X-S签名机制进行请求验证,本笔记完整记录了该签名机制的逆向分析过程,包括环境模拟、算法还原和完整实现。

逆向入口定位

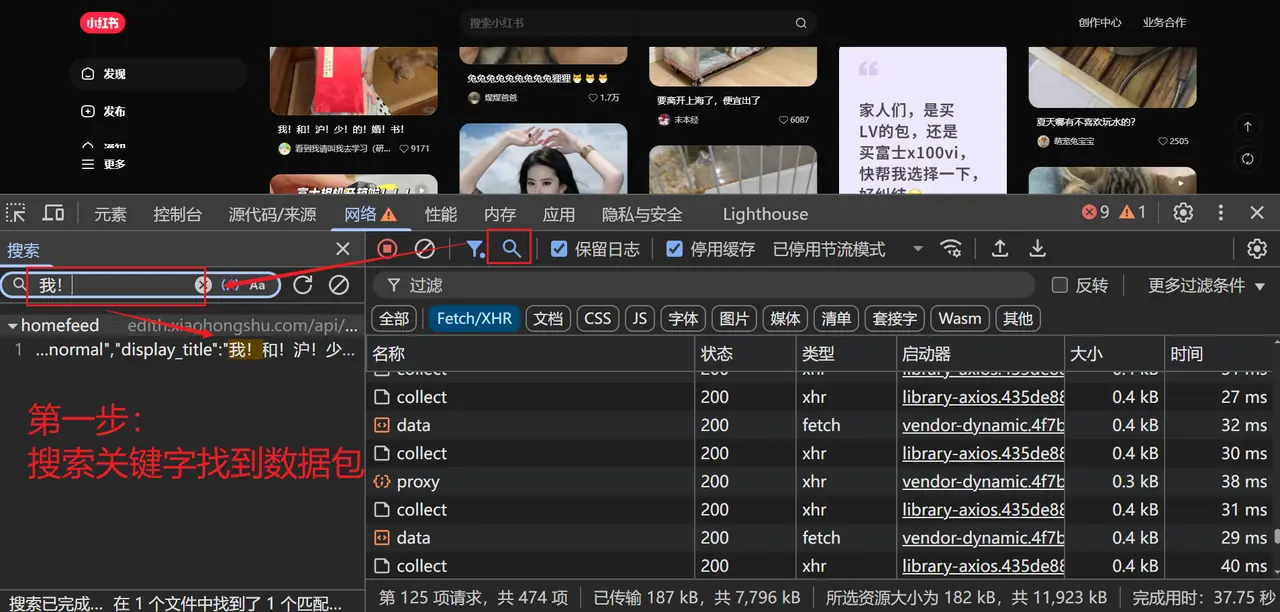
我们首先通过浏览器开发者工具定位签名生成的入口:

  1. 打开小红书探索页,启动 DevTools 切换到 Network 面板
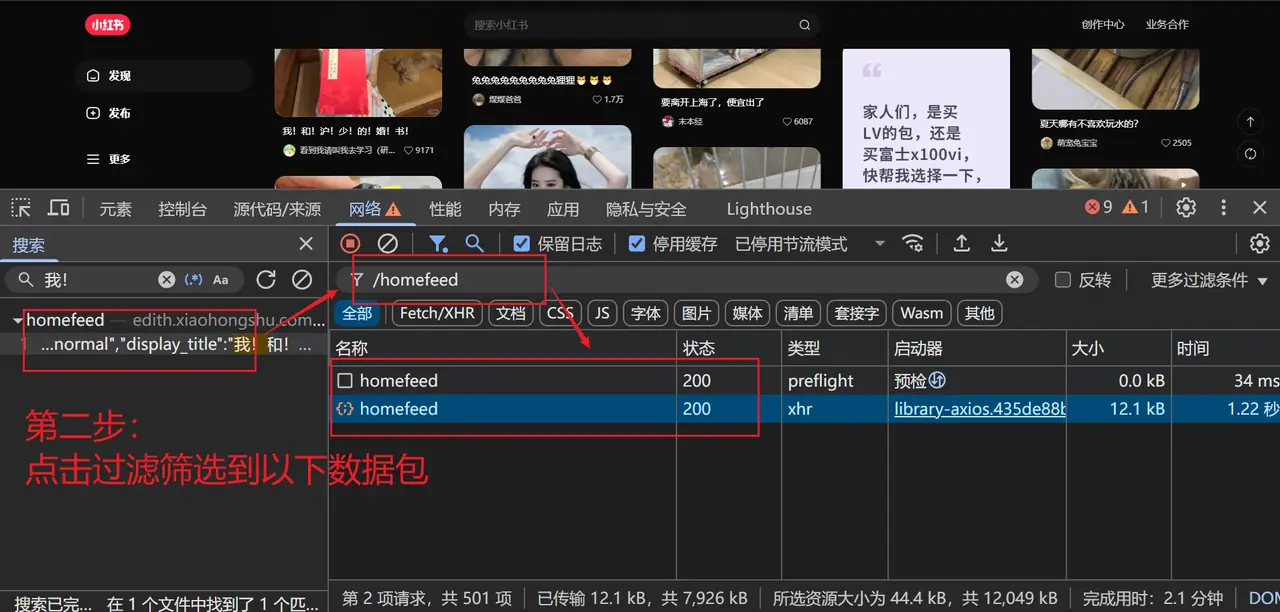
  2. 筛选 XHR/Fetch 请求,找到携带
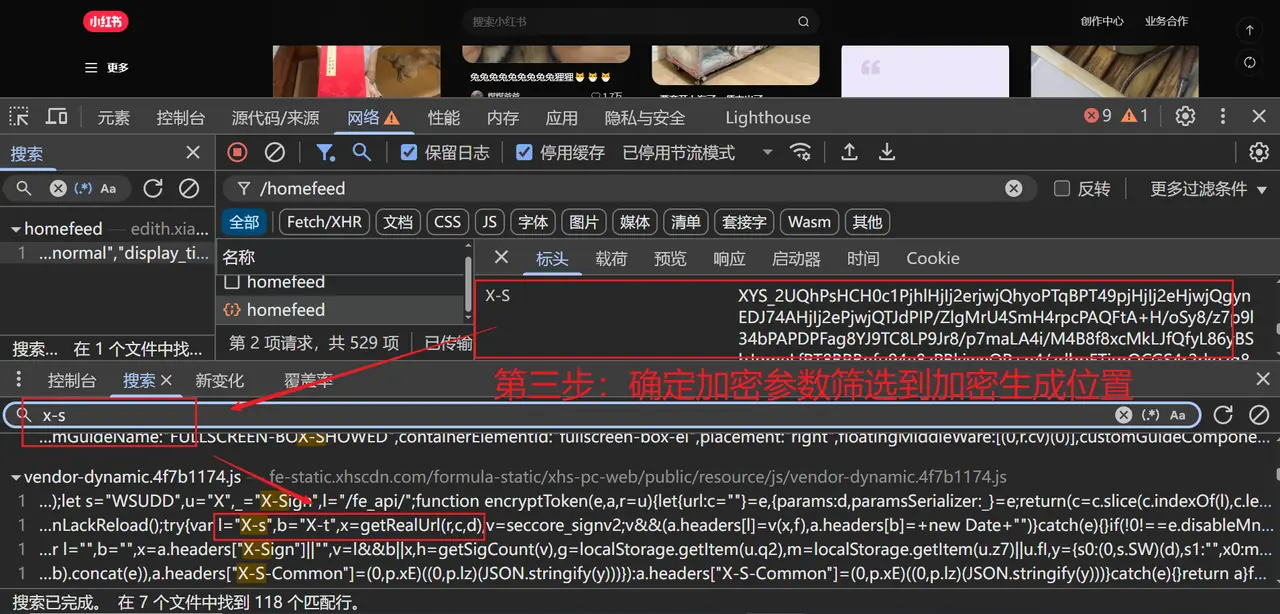
X-S请求头的接口(例如首页 feed 接口/api/sns/web/v1/homefeed
  3. 在 Sources 面板中搜索X-S关键字,或使用XHR/fetch Breakpoints断点拦截请求,回溯签名的生成逻辑

以下是分析过程中的关键截图参考: 1752734634041-cf93099e-5339-441c-964d-d03698bcda3e.png 1752734750599-d6e5fce2-3c0d-4a5e-9cc3-ca95f129c2c4.png 1752734864195-78c9f6e6-40b0-4235-81c0-8577d7985060.png

核心签名流程分析

1. 签名生成步骤

通过分析,X-S的生成流程可分为以下几步:

  1. 将 API 路径与请求参数拼接为 JSON 字符串
  2. 计算该字符串的 MD5 值
  3. 调用mnsv2算法,结合 MD5 值生成核心签名
  4. 组装包含版本、平台等信息的对象,经过 UTF-8 编码、自定义 Base64 编码后,加上XYS_前缀得到最终X-S

2. 关键数据结构

最终组装的签名对象结构如下:

const signObj = {
    x0: "4.2.1",        // API 版本号,需与当前页面对应
    x1: "xhs-pc-web",   // 平台固定标识
    x2: "Windows",      // 操作系统信息
    x3: signature,      // mnsv2 算法生成的核心签名
    x4: 'object'        // 固定字段
};

关键代码实现

1. 浏览器环境模拟

小红书的签名算法会检测浏览器环境,因此需要在 Node.js 中模拟常用的全局对象:

// 全局对象代理与模拟
window = watch(global, "globalThis");
self = window;
globalThis = self;

// 浏览器核心类模拟(仅示例,需根据实际情况补全属性)
Navigator = function() {};
Location = function() {};
Storage = function() {};
Screen = function() {};
HTMLHtmlElement = function() {};
HTMLBodyElement = function() {};
HTMLDocument = function() {};

2. 核心签名函数

以下是签名生成的主逻辑:

const CryptoJS = require('crypto-js');

function generateXSign(apiPath, params) {
    // 1. 拼接 API 路径与参数 JSON
    const paramStr = apiPath + JSON.stringify(params);
    
    // 2. 计算拼接字符串的 MD5
    const md5Hash = CryptoJS.MD5(paramStr).toString();
    
    // 3. 调用 mnsv2 算法生成核心签名(需单独引入/实现)
    const signature = window.mnsv2(paramStr, md5Hash);
    
    // 4. 组装最终对象并编码
    const signObj = {
        x0: "4.2.1",
        x1: "xhs-pc-web",
        x2: "Windows",
        x3: signature,
        x4: 'object'
    };
    
    const signJson = JSON.stringify(signObj);
    const utf8Bytes = encodeUtf8(signJson);
    const base64Str = b64Encode(utf8Bytes);
    
    return "XYS_" + base64Str;
}

3. 辅助编码函数

需注意小红书使用的 Base64 编码可能为自定义字典,以下为框架示例:

// UTF-8 编码
function encodeUtf8(str) {
    return unescape(encodeURIComponent(str));
}

// 自定义 Base64 编码(需根据逆向结果调整字典)
function b64Encode(input) {
    const keyStr = "ABCDEFGHIJKLMNOPQRSTUVWXYZabcdefghijklmnopqrstuvwxyz0123456789+/=";
    let output = "";
    let i = 0;
    while (i < input.length) {
        const char1 = input.charCodeAt(i++);
        const char2 = input.charCodeAt(i++);
        const char3 = input.charCodeAt(i++);
        const enc1 = char1 >> 2;
        const enc2 = ((char1 & 3) << 4) | (char2 >> 4);
        const enc3 = ((char2 & 15) << 2) | (char3 >> 6);
        const enc4 = char3 & 63;
        if (isNaN(char2)) {
            enc3 = enc4 = 64;
        } else if (isNaN(char3)) {
            enc4 = 64;
        }
        output += keyStr.charAt(enc1) + keyStr.charAt(enc2) + keyStr.charAt(enc3) + keyStr.charAt(enc4);
    }
    return output;
}

端到端调用示例

我们可以使用 Python 调用 Node.js 脚本生成签名,并发起实际请求。

1. Node.js 签名脚本(小红书.js)

将上述代码整合,并在最后输出结果:

// ... 上述所有代码 ...

// 示例调用
const apiPath = '/api/sns/web/v1/homefeed';
const params = {
    cursor_score: "",
    num: 31,
    refresh_type: 1,
    note_index: 10,
    unread_begin_note_id: "",
    unread_end_note_id: "",
    unread_note_count: 0,
    category: "homefeed.fashion_v3",
    search_key: "",
    need_num: 6,
    image_formats: ["jpg", "webp", "avif"],
    need_filter_image: false,
};

const x_s = generateXSign(apiPath, params);
console.log(JSON.stringify({ "X-s": x_s }));

2. Python 调用脚本

使用 Python 执行 Node.js 脚本,提取签名并发起请求:

import requests
import subprocess
import json
import re

# 替换为你自己的 Cookie
cookies = {
    'a1': '你的a1值',
    'web_session': '你的web_session值',
    # ... 其他必要 Cookie
}

# 调用 Node.js 脚本获取签名
output = subprocess.run(
    ['node', '小红书.js'],
    capture_output=True,
    encoding='utf-8',
    text=True
).stdout

# 解析输出的 X-S
try:
    sign_data = json.loads(output)
    x_s_value = sign_data["X-s"]
except json.JSONDecodeError:
    # 备用正则解析方式
    pattern = r"'X-s'\s*:\s*'([^']+)'"
    match = re.search(pattern, output)
    x_s_value = match.group(1)

print(f"生成的 X-S: {x_s_value}")

# 构造请求头
headers = {
    'accept': 'application/json, text/plain, */*',
    'content-type': 'application/json;charset=UTF-8',
    'origin': 'https://www.xiaohongshu.com',
    'referer': 'https://www.xiaohongshu.com/',
    'user-agent': 'Mozilla/5.0 (Windows NT 10.0; Win64; x64) AppleWebKit/537.36 (KHTML, like Gecko) Chrome/138.0.0.0 Safari/537.36',
    'x-s': x_s_value,
    'x-s-common': '你的x-s-common值',
    'x-t': str(int(__import__('time').time() * 1000)),
}

# 请求参数
json_data = {
    'cursor_score': '',
    'num': 31,
    'refresh_type': 1,
    'note_index': 10,
    'unread_begin_note_id': '',
    'unread_end_note_id': '',
    'unread_note_count': 0,
    'category': 'homefeed.fashion_v3',
    'search_key': '',
    'need_num': 6,
    'image_formats': ['jpg', 'webp', 'avif'],
    'need_filter_image': False,
}

# 发送请求
response = requests.post(
    'https://edith.xiaohongshu.com/api/sns/web/v1/homefeed',
    cookies=cookies,
    headers=headers,
    json=json_data
)

data = response.json()
if data.get('success'):
    items = data['data']['items']
    for item in items:
        print(item)
else:
    print(f"请求失败: {data}")

关键注意事项

  1. 环境模拟完整性mnsv2算法通常依赖navigatorscreen等对象的特定属性,缺失或错误会导致签名无效。
  2. JSON 序列化顺序JSON.stringify的参数顺序会影响 MD5 结果,需与浏览器端保持一致。
  3. 编码字典:Base64 编码可能使用非标准字典,需从逆向代码中确认。
  4. 版本与时效性x0版本号、mnsv2算法本身可能随站点更新而变化。

总结

小红书 Web 端的X-S签名通过“环境校验+多层编码+自定义算法”的组合保证安全性。完整实现该签名需要:精确模拟浏览器环境、正确构造请求参数、还原mnsv2核心算法,并严格遵循编码顺序。